0
Downloads today
1,911
Downloads total
0
Comments

description
Quick Info to Foundations coming update V1.6
Due to changes made to Iron Ore / mineral deposits. all custom maps will not load properly with the coming update. I looked into the modding prerelease and I am working on adding a mineral placement option and will drop a prerelease ASAP. the GUI will not be super comfy, but we will be able to quickfix our maps. Since Covid19 is getting less of an issue over here and work is dropping in quickly, I have to see, when I can work on the UFME. I will probably not spam the Discord with pictures of the work in progress anymore, so If you are interested in getting the latest updates, feel free to follow me over on Twitter @alpacaneer. Stay healthy, stay save!
Notes to V1.4
Translations added: if you want to change language, open the options.json file and adjust the language option.
Languages available: English(100%), German(90%), Korean(10%), French(90%)
for drag and drop: click, to mark waypoint with red circle, click and hold to move.
Notes to V1.3
You can now preview your map in 3d: menu>>view>>3d preview
You can let the editor predict starting tiles: menu>>view>>show starting tiles
Improved loading function
Improved Import function: Import any png in any size
Notes to V1.2 and easy mode
easy mode changes all input boxes to scales, that allow you to pick values in a specific range. So its easier to pick "good" values. Easy Mode also hides some parameters that work just fine on their defaults. If you don't want to use Easy mode, go to View>>EasyMode and deselect it.
Video Guides:
Getting Started:
Importing Heightmaps:
Map Guide by Ash:
Getting Started - Guide
This is a simple getting started guide and will not introduce all parameters in detail for now. Heights in the heightmap are 0…65535, for more practical use, I scaled it to 0-1000. If you already have a heightmap, hop down to step 7.
Step 1: create a new Workspace
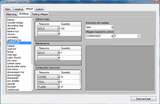
First create a new Workspace by clicking File>>New Workspace. When creating a new Workspace, the Map Info window opens. Here you can enter a map name, an id, your name and a description.
Step 2: create a baseline map
To get a natural plain area, you can build a map upon, click build baseline map. The parameters are set to default, so you don’t need to worry about them now.
Step 3: how to add a river:
To add a river to the menu bar and click Add>>River.
A River Menu appears in the left and an empty preview in the preview part. Now you can change the starting and ending waypoint coordinates. The map has the size 1024,1024, so your input should correspond, x=0, y=0 is in the top left corner, 1023/1023 is the bottom right. You can go outside the window with negative values and values above 1023.
You can also add more waypoints to the river and more rivers to the map. To make it easier to predict, where everything goes, all rivers and mountains are previewed as polylines on the main screen.
When you are done, click generate to get a preview and create the river information for the heightmap.
Step 4: how to add a mountain
To add a mountain, click Add>>Mountain.
A mountain menu appears in the left and an empty preview in the preview part. Change coordinates like in the river description.
Step 5: How to add a dip
A dip is just a negative mountain, so change the height to a negative value.
Step 6: generating a heightmap
go to the top menu: generator>>build heightmap. All rivers and mountains will be combined to one map: now you have your heightmap! Please note that no matter how high or deep you map is, it is always rescaled to 0…65535 Steps. Foundation will determine the final height and depth from the Height and Water Level parameters in the Map Info window: File>>Map Info
skip step 7.
Step 7: Importing a heightmap
Only do this step, if you skipped 1-6. You can Import your own heightmap (actually you can import any 1024x1024 png as a heightmap) by clicking the button import heightmap or file>>import heightmap.
set the post sigma value (the filter radius) to zero and do step 6.
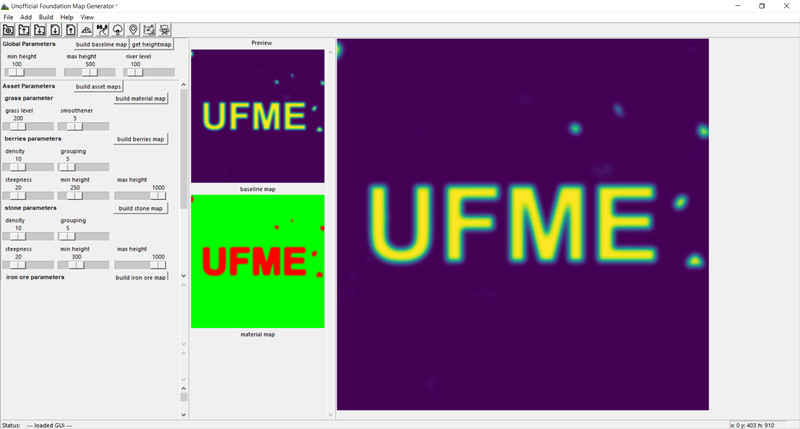
Step 8: generating a Material Mask
Now that you have a heightmap, change the view back to view>>priority>>assets, the assets parameters expand.
Clicking the build material mask button will get you a material mask, experiment with the height to get it the way you want it. You can also use the mouse over the main screen to get the height of each pixel.
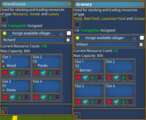
Step 9: generating resource maps
Resource maps are berries, rocks, iron and fish. From the height of the material map you can now predict the min height, if you want resources up to the beach. To not have resources in steep areas, the steepness parameter can be used. 10...40 are good values to experiment with. Density is the chance that in the areas, where placement is allowed, a resource is placed. Group is the chance that a larger group is placed (in %) .
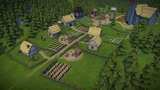
Step 10: adding Trees
Use the Add>>Trees function to add a tree map. Similar to resources, you can set steepness, min height and max height, sigma applies a filter to smoothen out the edges. You can also add more tree types and configure them. Tree types define, what trees are planted with the tree map, what color they have and what size range they have. When changing colors, keep in mind, that clear white colors them the way they are, overly saturated colors color the whole tree like that, so if you just want to add a nice touch, use less saturated values. I have added a few color presets that canbe selected from a list in v1.2
Step 11: adding village paths
Use add>>village path to add entry and exit points. (buginfo: I have not yet inverted the y axis) the main screen shows entry points with a green marker and exit points with a red marker, also if activated, a dotted line connects the two markers.
Step 12: define the height scale
In the mod.lua file that comes with the map, the ingame height and the water level are defined. normally maps scale around 100 but that heavily depends on your map. Open the map info (File>>MapInfo). here you can set the height and the water level. From version 1.2 you get a cut-through preview of the map, that should help you find good values for the height and the water level. after cooking the map, you have to check ingame, if it fits. Afterwards you can either change the values in the mod.lua file or re-cook it in the editor. please note, that in the lua file its not a height and a water level parameter, but a top and bottom parameter(max/min).
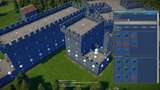
Step 13: cooking the map
Use generate >> cook map to open the cook map window. Don't bother the options that are not marked / logged (unmark what you don't want to rebuild). If the Cook button is not disabled, you can cook your map. When finished, the cooked folder opens and you can copy all files to the Foundation mod folder.
This Project is programmed in python 3 and open source. all scripts provided on the Github Repository
Credits
-
14 Jul 18:39Version 1.4.0
Fixed: Saving deleted Mountains and Rivers
Fixed: Having no workspace referenced after loading failed
Fixed: Dublicating treeTypes when loading
Fixed: Minor view bugs
Fixed: Loading IssuesAdded: Import Options
Added: Map Info options
Added: fractal noise to basemap
Added: perlin noise to treemap option
Added: fractal noise to Mountains
Added: Translations to German, French and partly Korean
Added: Options.json for remembering preferences (gui interface will follow)
Added: drag and drop functionality to rivers, mountains and waypoints
added: add waypoints also inserts waypoints, if a waypoint is selected ( marked with red cycle)Changed: The way mountains and Dips are added/subtracted
Changed: Disabled the rescaling of the whole map due to change how mountains are handled
Files
19.03 2020
Empfehlungsrate
-/-
noch nicht genug Stimmen
Do you think this mod should be featured?
Mod abonnieren

0 Comments for Unofficial Foundation Map Editor